So, for me, it is summer break and I am working. With this being said I have decided to start another book to occupy my time. Much like my last book, this will end up being a photo album, only this time it will be all of my own work.
Wednesday, May 28, 2008
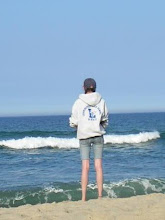
Trip to the Beach
A few days ago I found myself surf-casting with my dad. Although it rained for a bot and was windy, I was able to take a few photos.


Thursday, April 24, 2008
The Best Part
The best thing about these altered photo albums is that they are personal, unique, not very time consuming and make amazing gifts. For a gift you can even set a theme; the photos that went into this book were photos of my friends and I through the years. This is just one thing you can do with your book.
A few things from the book:
* To hold the photos in I used sticky photo corners- I used the black ones for this book but the colored ones work too! (I personally do not like the clear ones that come on a roll I find they do not stick very well)
* One other note about my book: The book no longer closes all of the way. By gluing the pages together and adding photos you expand the book; if this is not a problem for you you can leave it, if you want your book to close all of the way this can be remedied by using a utility knife or excato to cut some of the pages out, just make sure you cut as close to the binding as possible as to not get ridges.
Good Luck and Have Fun!!
Tuesday, April 22, 2008
Cover Art
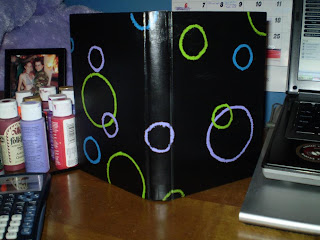
Now that the inside of the book has been altered, it is time to update the cover!
For this book I simply painted the whole cover black and then created bubbles.
 (Painted cover)
For this book I simply painted the whole cover black and then created bubbles.
 (Painted cover)
(After the cover dried I used a clear spray paint to seal it and give it a nice shine!)
Sunday, April 20, 2008
More Pages!
Here are the rest of the pages in order of appearance in my book:

(Here I used a single coat of blue paint, this allows you to still see the words somewhat)
 (These are just some bubbles)
 (These are just some bubbles)
(For this one I used a thin purplish paint to color the pages, then used the non-bristled end of my paint brush to add the dots)

(Just some stripes white mixed with red and a little black and black mixed with a little red and white)
 (Again, I just mixed some colors- blue and grey)
 (This is one of the inside covers)
 (Here is the other inside cover. I used the thin purplish color so you can still see the original art from the book.)
Wednesday, April 16, 2008
Now, the fun part!
Now, I get to paint and design the backgrounds for each page! This part is where you can be as simple as you wish- or go crazy and explore!
Here are the first few pages:

(This page I just painted purple, then went back with little amounts of paint and essentially poked the page to smudge the grey around.)
 (This was done with the same dabbing motion only I did not paint the page first.)
 (Here I just painted a swirl.)
Here are the first few pages:

(This page I just painted purple, then went back with little amounts of paint and essentially poked the page to smudge the grey around.)
 (This was done with the same dabbing motion only I did not paint the page first.)
 (Here I just painted a swirl.)
Tuesday, April 15, 2008
It begins...
Just last night I began work on my next project book. I am turning and old hardcover child's book into an altered photo album.
 This is my old ready-to-be-altered book.
 To start, I sectioned off the pages to make several thicker pages, these will be the photo pages!
To do this:
1) Get some white glue and a paintbrush
2) Glue some pages together- glue as many as you want for each page (in this one I used about 10 pages each)
3) As you glue, use clothes pins to keep any glue that oozed out from making the other pages stick together.
Ta-da!! Your book is prepped and ready for art!
Thursday, April 10, 2008
My Pets
Here are just a few pictures of not only my pets, but also some other fuzzy critters that have found their way to my home. 
(Roxy, a family friend's puppy)

(Loui, my adopted Love-Heart Parrot Fish)

(A few of my Tetras, Loui's tank mates)

(Bruce, my "former" hamster)

(Just a squirrel on the woodpile in my back yard)
Sunday, April 6, 2008
Sharing is Caring
In my search for a book to alter, I have decided to contact my local library. This is a good way to get large books that do not cost you AND you keep these book out of the dumpster in the back! To get a book from the library all I had to do was email one of the staff members explaining what I needed and asking if there were any books that they were planning on getting rid of; I believe this is called a "delete list." Within a couple of days I received an email saying that they thought they might have something I may be able to use.
Although I was able to get a book, I will not be working it this specific one. Instead, I have decided to give it to my sister's boyfriend's brother; he has never done an altered book before and is currently looking into art schools. This being known I decided that he may find this an interesting and different way to express himself (while preventing the scattered sketch papers strewn across his bedroom).
Although I was able to get a book, I will not be working it this specific one. Instead, I have decided to give it to my sister's boyfriend's brother; he has never done an altered book before and is currently looking into art schools. This being known I decided that he may find this an interesting and different way to express himself (while preventing the scattered sketch papers strewn across his bedroom).
Tuesday, April 1, 2008
Ah-HA!
While going through my photos I realized there are quite a few photos I would like to be able in one way or another display; my only snag- my room is already full of photo frames and I have run out of room on my shelves and desk. My solution comes from an article on Creativity-Portal.com. This essentially is an altered book set up to be a photo album.
Here is a link to the page where it shows step-by-step instructions, complete with photos!!
Here is a link to the page where it shows step-by-step instructions, complete with photos!!
Saturday, March 29, 2008
Can you see me now?
 Now I have outlined my fish. It makes them much easier to see. it also fixes those little "oops" sections where a piece may have stuck too far out of its outline.
Tuesday, March 25, 2008

Wednesday, March 19, 2008
Fresh Fish!

While it has been some time since I rediscovered this piece, it has once again been put on the back burner. That is until tonight when I had a few minutes to spare so i decided to fill in the sand. This is not the best photo because the glue/water mix had not yet dried all of the way, but here is an updated photo!
Wednesday, March 12, 2008
Holiday Craziness
As Easter oddly appears right after St. Patrick's Day, it does not leave much time to prep for the occasion. So, in my semi-frantic search for the "new and exciting" gift for family members (everyone is sick of getting a plant that will flower then either die or grow to some outrageous size) I decided to mix tradition and a trip to the craft store.
I have seen these vases with little pebbles and fake flowers everywhere from tv to magazines and decided it was time to give it a try. After a quick run to my local craft store I gathered a vase, a bag of glass rock/pebble things, and a couple of fake flowers (do not ask me what they are because I honestly have no idea!)
Here are the materials strewn about my floor:

And here is the final product:

Oh, one last thing, the stems on fake flowers are incredibly hard to cut; I suggest wire cutters!
Tuesday, March 11, 2008
More Art
These are just a few bits of some other pages and some of my photos.

For this page, I decided to illustrate lyrics from AFI's Sing the Sorrow album. I used acrylic paint for the background and just did not cover the page completely to get the blotchy effect. Also, for the wording, I used a tooth pick dipped in paint to scratch the words.

Just a photo taken in my backyard of some Morning Glories.

This page started out as a star cut from about 5 pages on each side (basically I just glued some pages together and cut out the edges to look like a star) however, I did not like how they came out, so I glued the star pages down and added a magazine cut out of a Godzilla wind-up toy.

Over the summer, I went to a baseball game while camping in Cape Cod. This game, as one could probably guess form the photo was first delayed in the 3rd, then called for the fog in the 7th. This was taken during the delay and the fog was actually more intense in person!
Monday, March 10, 2008
Looking Ahead

(Co-Instructor Walking across our home field)
So, we are partway into March and I have already begun to think about this coming summer and fall. Yes, I know it is a long way away, but that doesn't matter. Aside from art, I marched with my high school for 5 years and am now an Instructor for Color Guard. For those who may not know, the Color Guard are the people who spin flag, rifle, saber, and sometimes even dance!

(First time the band performed in Fall 2007)

(Playing in front of our local Applebees)

(Getting on the field for the first time in 2007)
Monday, March 3, 2008
Looking Back
While working on my re-found piece, it got me really thinking about all of my old art classes in high school. So in my reminiscent mood I tracked down one of my teacher's website for the class and links to other art sites.
It was Mr. Bruce Dean who first introduced me to altered books and even helped to select a piece for me to turn in for competitions. As it turned out, the piece selected was a page from my altered book, so it had to be cut-out and matted.
It was Mr. Bruce Dean who first introduced me to altered books and even helped to select a piece for me to turn in for competitions. As it turned out, the piece selected was a page from my altered book, so it had to be cut-out and matted.

Thursday, February 28, 2008
I Found Nemo
In my never ending rummaging through my belongings and my house in general, I have run across an abandoned and unfinished piece.

Having been stuffed behind the couch, this project went forgotten for, well, I can't remember how long; maybe it was junior year in high school?
Either way, I am excited to begin to finish this piece. Being one of my largest pieces- roughly 2ft on each side- it will give me a chance to expand my use of color and just make a big mess!
Stay tuned for updates and many more photos.
P.s. I cannot remember why I punched holes around the border but I will probably be covering them.
Sunday, February 24, 2008
Return of childhood
As an avid Muppet and Henson fan, I often find some Muppet-like critters popping up in my work. While digging through some photos and the like on my computer I once again found myself staring into the faces of Elmo and a snow angel (played by a family member and myself respectively). As a child, what more could you want: marching in a parade with Elmo, escorted by a firetruck and firefighters? After all, it was like two childhood dreams coming to life. (Photo by Ethan)

Thanks to a former Australian forum buddy, Grover and Ollie (an Australian Muppet) found their way into one of my altered books along with my stuffed Stitch.

Whoever said you needed either paper or a canvas has never been faced by the challenges of being a high school student with no money, in a school that did not treat the arts as well as anyone would hope. Outside of my books, a great many of my pieces are on cardboard. Not only is it sturdy and will not curl with a wet medium, it is also cheap and easy to find!

One of my favorite and most useful projects was painting discontinued tiles that were "rescued" before they went out to the trash. Not only are tiles unique, but given enough clear spray paint (I use it religiously to seal my work) they make durable coasters that can double as conversation pieces.
 And in Honor of the Late-Great Jim Henson I leave you with some of his quotes:
" The only way the magic works is by hard work. But hard work can be fun."
"Life's like a movie, write your own ending. Keep believing, keep pretending."
"My hope is to leave the world a little better for having been there."
Wednesday, February 20, 2008
Fun with the Sun
So you think that paint is the only way to show the sun?
Well, think again, especially in an altered book.
 Ahh, tissue paper, no longer just for little kids.
 Here, I once again glued a bunch of pages together and cut out the cactus, the spines/wolves are made out of cardboard (sorry, the picture doesn't show it too well)

Well, think again, especially in an altered book.
 Ahh, tissue paper, no longer just for little kids.
 Here, I once again glued a bunch of pages together and cut out the cactus, the spines/wolves are made out of cardboard (sorry, the picture doesn't show it too well)
Friday, February 15, 2008
Happy (late) Valentines Day
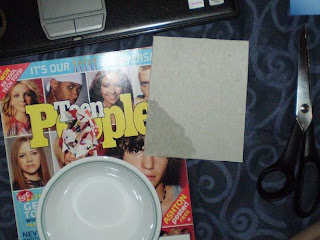
In honor of the passed Hallmark holiday, I will give you a step-by-step way to make a mini-mosaic homemade card.
Needed materials: heavy card stock (or a cereal box), drawing paper (or any heavy paper), two sided tape, school glue, old magazines.
 To start off: cut the card from the cereal box, draw out the outline then cut it out. Once you have your basic card shape, use double side tape or glue to hold a piece of heavy paper inside, this will give you a nice clean surface to write your note on (it also covers up the ink if using a cereal box).
 Next: Cut the spare paper off and square your card. Now is you chance to trace out the design or shape for the cover of the card.
Now for the fun part: go through old magaizes that you have laying around and cut out sections of whatever colors you will need. For this card, I chose red and pink, so as i flipped through the pages I cut out sections of red and pink.
*TIP*: do not just use the same shade of a color, mix darks and lights and different patterns.
Once you have gathered these color segments, cut them into small pieces, roughly 1/4 inch, they do not have to be squares, make whatever shapes you want making sure they have straight edges (curves are hard to work with).

Mix a little bit of water in a bowl with glue. Make sure there is more glue than water. Using your fingers or a brush, paint the card with the gluey mix and place your colored pieces to the card. It is easier if you work from the edges in, outline your shape and the card boarder first.
The corners will begin to curl up when the pieces are placed in the watery mix; do not panic!! All you have to do is take a little more of the mix and brush over the corners, using your fingers pat down any other corners that are sticking up.
 Once you have filled in all of the cover let it dry. Once dry you can brush the mix over the top again to make sure all pieces stay glued down; or, as I like to do, take clear spray paint and spray the card cover. This will seal the card keeping all pieces secured and will add a little bit of shine.
When all has dried- TA-DA- your card is ready for a lovely message!
This is one of my favorite mediums to work with, it is fun, relaxing, and best of all easy and messy! Enjoy!
Tuesday, February 12, 2008
Getting Artsy
When creativity starts to flow, why bother hiding it? Explore new styles, new supplies, and old art projects...


Yes, I did sit there and stitch in all of those beads. It was a great way to use up some spare time!
Subscribe to:
Posts (Atom)